Streamlining Containerized Web Application Deployment with AWS ECS, ECR, GitHub, and CodePipeline: A Complete Guide

In modern software development, continuous integration and deployment (CI/CD) pipelines are essential for automating the build, test, and deployment processes. Docker, together with cloud services like Amazon Web Services (AWS), allows developers to package applications and deploy them efficiently and consistently across different environments. In this guide, we will walk you through how to streamline the deployment of a containerized web application using AWS ECS (Elastic Container Service), Amazon ECR (Elastic Container Registry), GitHub, and AWS CodePipeline.
By the end of this blog, you’ll have a fully automated CI/CD pipeline that pulls code from GitHub, builds a Docker image, pushes it to ECR, and deploys it to ECS using AWS CodePipeline.
Step 1: Setting Up the AWS Infrastructure
Before we dive into the pipeline setup, we first need to configure the necessary AWS services that will handle our containerized application: Amazon ECR, Amazon ECS, and AWS CodePipeline.
1.1: Create an Amazon ECR Repository
Amazon ECR (Elastic Container Registry) is a fully managed Docker container registry where you can store, manage, and deploy Docker images. Follow these steps to create a repository:
- Go to the ECR Console.
- Click on Create Repository.
- Enter a name for your repository (e.g., rambunct-demo).
- Choose whether you want the repository to be public or private (private is the default).
After creation, you’ll get a repository URI, which looks something like this:
<AccountID>.dkr.ecr.us-east-1.amazonaws.com/rambunct-demo
- This is the URI you will use to tag and push Docker images from CodeBuild to ECR.
1.2: Create an ECS Cluster, Task and Service
Now that we have an ECR repository, let’s set up Amazon ECS (Elastic Container Service), which will manage and deploy our containers.
- Go to ECS Console, click Create Cluster.
- Select Fargate as the launch type.
- Provide a cluster name (e.g., demo-rambunct) and click Create.
- In ECS Console, go to Task Definitions and click Create new Task Definition.
- Choose Fargate as the launch type.
- Set task name, provide ECR image URI, and set port mapping (3000).
- Choose memory and CPU settings, then click Create.
- Go to your cluster, click Create under Services.
- Select Fargate, task definition, and service name .
1.3: Set Up IAM Roles and Permissions
Before we proceed, ensure you have the correct IAM roles with the required permissions for CodePipeline, CodeBuild, and ECS to interact with each other.
Step 2: Set Up CodePipeline with GitHub, CodeBuild, and ECS
Now that the infrastructure is set up, we can create CodePipeline, which automates the CI/CD process. GitHub will serve as the source for the application code, CodeBuild will build the Docker image, and ECS will deploy it.
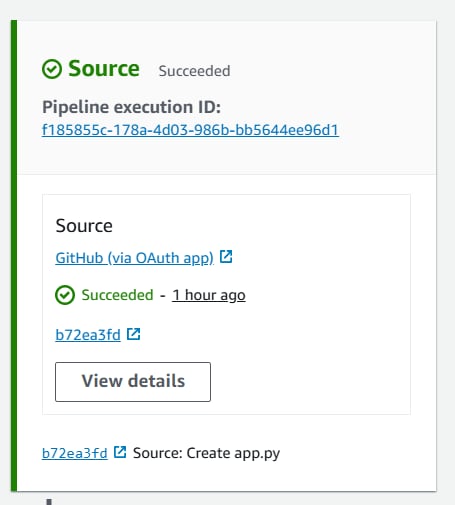
2.1: Set Up the Source Stage (GitHub)
In the Source stage, we will configure AWS CodePipeline to pull code from GitHub. This is where your application code and Dockerfile are stored.
Dockerfile example:
# Use Python base image
FROM python:3.9-slim
# Set the working directory inside the container
WORKDIR /app
# Copy the requirements file
COPY requirements.txt .
# Install dependencies (Flask in this case)
RUN pip install -r requirements.txt
# Copy the rest of the application code
COPY . .
# Expose port 5000 for the Flask app (default Flask port)
EXPOSE 3000
# Start the Flask application
CMD [“python”, “app.py”]
app.py example
from flask import Flask
app = Flask(__name__)
@app.route(‘/’)
def hello():
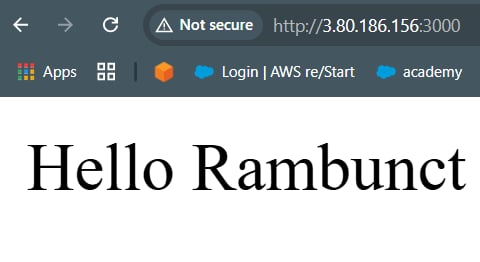
return “Hello Rambunct”
if __name__ == ‘__main__’:
app.run(host=’0.0.0.0′, port=3000)
- Go to the CodePipeline Console and click Create Pipeline.
- Enter a name for your pipeline (e.g., rambunct-demo-pipeline).
- For the Source provider, choose GitHub and connect your GitHub account.
- Select the repository and branch (e.g., main) that contains your Dockerfile and application code.
2.2: Set Up the Build Stage (CodeBuild)
Next, we will configure AWS CodeBuild to build the Docker image from the Dockerfile stored in GitHub and push the image to ECR.
- In the build provider select other build providers and AWS CodeBuild.
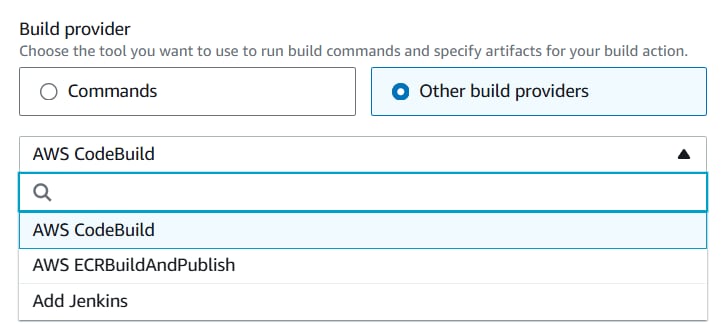
- Select create a project and provide the service role with access to ECR
- Set buildspec.yml as the buildspec file (this will be used to define the build steps).
The buildspec.yml file tells CodeBuild how to build the Docker image and push it to ECR. Here’s an example buildspec.yml: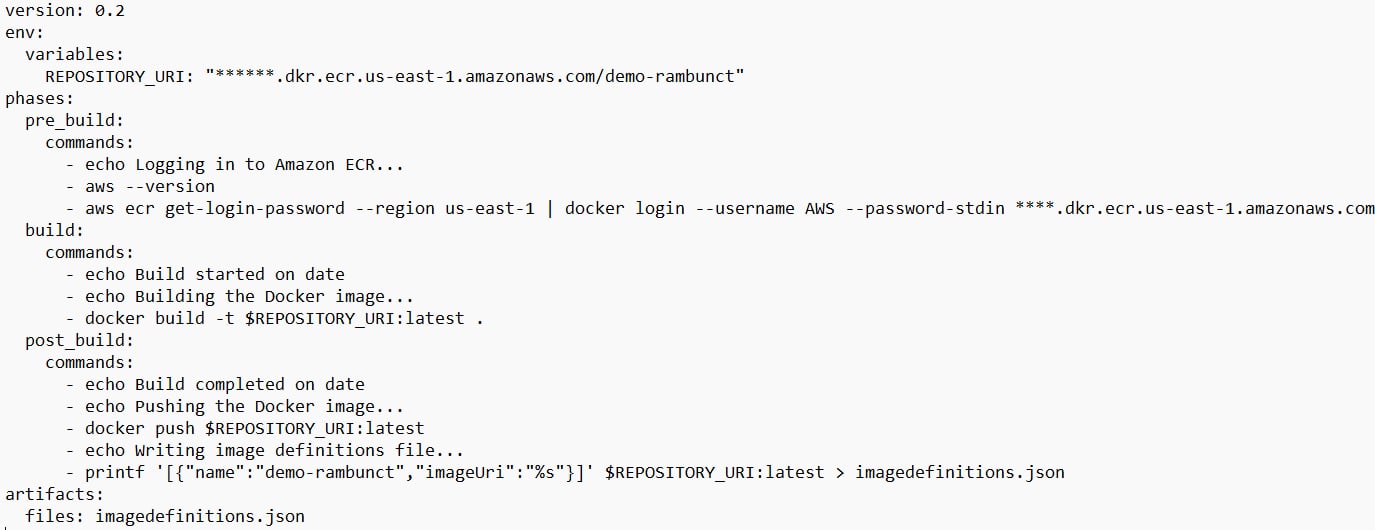
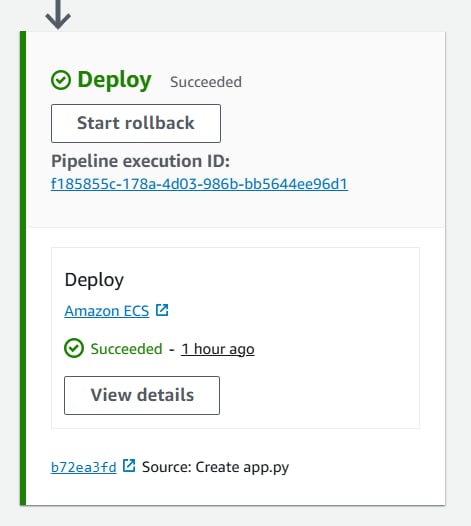
2.3: Set Up the Deploy Stage (Amazon ECS)
The Deploy stage will deploy the Docker image from ECR to ECS.
- In CodePipeline, for the Deploy stage, choose Amazon ECS as the deploy provider.
- Select your ECS Cluster and Service.
- Configure the Task Definition to reference the Docker image in ECR (********.dkr.ecr.us-east-1.amazonaws.com/rambunct-demo:latest).
- Use the imagedefinitions.json file generated in the Build stage as the input artifact.
Step 3: Monitor and Test the Deployment
Once everything is set up, you can trigger the pipeline by pushing code to the GitHub repository or manually starting the pipeline.
CodePipeline will:
- Pull the latest code and Dockerfile from GitHub.
- Use CodeBuild to build the Docker image and push it to ECR.
- Deploy the image to ECS


You can monitor and troubleshoot the deployment using:
- ECS Console: View the status of your ECS tasks and services.
- CloudWatch Logs: Check the logs generated by your ECS containers.
- CloudWatch Alarms: Set alarms to notify you of failures or performance issues in ECS.
Also the output can be observed using HTTP link
Conclusion
By combining Amazon ECS, ECR, GitHub, and CodePipeline, you can create a streamlined and automated deployment pipeline for your containerized applications. This CI/CD pipeline ensures that whenever new code is committed to GitHub, it is automatically built, pushed to ECR, and deployed to ECS. With this setup, you can focus on developing features while CodePipeline handles the building, pushing, and deployment process.

")